Computer And Technologies

Computer And Technologies: 05/09

Friday, 29 May 2009

How CVS will help to Realtime Developers ?

The CVS commands here assume that you are using the command line version of CVS. Tips and tricks for a specific CVS GUI are specific to each GUI and do not really belong here.

Viewing the commit log of a file.

$ cvs log filename

Show current status of a file.

The status command will show you the latest version, the version in your working directory and if your local copy has been modified.

$ cvs status filename

Performing a CVS diff

After developers have checked in updates to the code it may be beneficial to see what has changed, either to help solve bugs or to track changes. There are several option to do this.

  1. Perform a diff between complete branches:

$ cvs -q diff -u -r BRANCH1 -r BRANCH2

  1. Perform a diff between a single file in two branches:

$ cvs -q diff -u -r BRANCH1 -r BRANCH2 filename

  1. Perform a diff between different versions of a file:

$ cvs -q diff -u -r version1 -r version2 filename

  1. Perform a diff between working version and most up to date file in database:

$ cvs -q diff -u filename

  1. Perform a diff between working version and a specific database version:

$ cvs -q diff -u -r version filename

Retrieving CVS Information on Files

To retrieve the current version and other relevant information about a file run:

$ cvs status filename

To retrieve the entire change log pertaining to a file run:

$ cvs log filename

Retrieving CVS Files Based Upon Revision

To retrieve a file from CVS based upon a revision number perform the following:

$ cvs -q up -Pd -r revision filename

  • To get the revision number use the log command above

Tag file in CVS as a Release

To tag files in CVS as a release perform the following:

$ cvs tag

  • Run the command from within the release source dir.

Creating a Branch

I like to do the following before creating a branch:

See what tags are available and pick one.

$ cvs -q log filename

Revert to a tagged version of HEAD.

$ cvs -q up -r TAG_Version

To create a branch in CVS perform the following:

$ cvs tag -b

Run the command from within the release source dir. This should be done in the top level directory of the project. The chosen_branch is something like BRANCH_36_BUG_.

cvs -q up -r

$ cvs -q status <-- confirm that the branch has specified as the tag

$ cvs tag _mm_day_year <-- eg: BRANCH_12_BUG_12345_07_17_2009

Reverting to a Branch

To revert to a branch in CVS perform the following:

$ cvs -q up -r

  • Run the command from within the release source dir. This should be done in the top level directory of the project. The chosen_branch is something like BRANCH_BUG_.

Verifying you are in a branch

To verify you are in a branch

$ cvs -q status

You will see that the branch is a sticky tag.

Merge Current Branch with HEAD

Ensure that you are in the branch by reverting to the branch and Verifying that you are in the branch.

$ cvs update -j

This will ensure that you are your branch is getting merged properly with HEAD so the only differences you see between your branch and the are changes that you made. You can verify this from your branch with:

$ cvs -q diff -u -r | less

You will eventually have to commit your changes you should always do a tag on the branch after your commit.

$ cvs tag

Merge HEAD into Current Branch Multiple Times (with tags) and without -kk option

$ cvs update -j -j

This command will unfortunenately result in a lot of your ID tags getting changed at the top. Using the --kk option will avoid this problem. But then you won't see which files have changed and You won't know who last modified a file easily. After you run this command I recommend:

$ vim `cvs up -d | grep '^C' | sed -e 's/^C //'` 

You may find the following page interesting as well: http://kb.wisc.edu/middleware/page.php?id=4087

This will grab all of the conflicting files. You can save them with :w. And step through them with :bn. You can easily close them all with :wq!.

Merge HEAD into Current Branch Multiple Times (with tags)

To merge current HEAD into a branch that has already had HEAD merged into it once, the differences between that last merge and current HEAD need to be gathered and applied to the branch. This is done by finding out when the last time HEAD was merged with the branch. Hopefully you tagged your branch. Repeat steps 1 and 2 from the previous section to create a tag for HEAD and to create a tag for your branch so you can have a backup/reference point. Then, perform the following if you have tagged the branch when merging the last time:

$ cvs update -kk -j -j

  • Run the command from within the branched version. is the old tag in HEAD from the last time you merged (the tag that you created in Step one from the previous section). If you in this case, the format will likely be the following:

$ cvs update -kk -j UPDATE_HEAD_36_BUG__06_16_2008 -j UPDATE_HEAD_36_BUG__07_23_2008

The first tag is the one created the last time HEAD was merged into the branch. The second tag is one that should have been just created. This will take all the differences between the two tags, and bring them into the branch. The next time a merge from HEAD into the branch occurs, this latest tag will be the "old" tag, and the new tag will be created at the time of the merge.

The reason for tagging the branch before a join/merge like this is to create a reference point to revert to if the need ever arises. The -kk option removes rcsid tags so that the cvs tag at the top doesn't get flagged as a conflict on every merge/join.

Merge HEAD into Current Branch Multiple Times (without tags)

If no tags have been created for the branch when HEAD was merged into a branch at a previous time, an alternative is to use the daily build tag. Find the commit message of the last time HEAD was merged into the branch and was committed and select the daily build tag the day BEFORE that one (but only if the commit was before the daily build that day, i.e. before lunch time for GMT -06:00). An example is provided below on how to merge without tagging:

$ cvs update -kk -j Tag_Branch -j HEAD>

Run the command from within the branched version.

----------------------------------
To Avoide network confusion :-

use :- alias cvs=`cvs -z9`

causes cvs to use compression level 6.

Good links for it:-

  • http://datagrams.blogspot.com/2009/01/how-to-deploy-cvs-concurrent-versions.html
  • http://kb.wisc.edu/middleware/page.php?id=4087
  • http://ximbiot.com/cvs/manual/cvs-1.11.21/cvs_10.html#SEC85
  • http://ximbiot.com/cvs/wiki/Special/Index
For More :- http://scmgalaxy.com/cvs-commandline/

Thanks,
-Amaresh
Thursday, 28 May 2009

How to edit Grub loader?


GNU GRUB ("GRUB" for short) is a boot loader package from the GNU Project. GRUB is the reference implementation of the Multiboot Specification, which allows a user to have several different operating systems on their computer at once, and to choose which one to run when the computer starts. GRUB can be used to select from different kernel images available on a particular operating system's partitions, as well as to pass boot-time parameters to such kernels.

GRUB is dynamically configurable; it loads its configuration at startup, allowing boot-time changes such as selecting different kernels or initial RAM disks. To this end, GRUB provides a simple, bash-like, command line interface which lets users write new boot sequences.

GRUB is highly portable. It supports multiple executable formats, and is geometry translation independent; while Multiboot compliant, it supports non-multiboot operating systems such as Microsoft Windows and OS/2 via a chain loading function. GRUB supports all commonly used Unix file systems as well as VFAT and NTFS as used by Windows, and supports Logical Block Address (LBA) mode. GRUB allows users to view the contents of files on any supported file system.

GRUB can be used with a variety of different user interfaces. Most Linux distributions take advantage of GRUB's support for a graphical interface to provide a customized boot menu with a background image, and occasionally mouse support.[citation needed] GRUB's text interface can be set to use a serial link to provide a remote terminal boot loader access.

GRUB can download operating system images from a network, and can thus support disk-free systems. GRUB supports automatic decompression of OS images prior to booting from them.

GRUB differs from other boot loaders by being able to communicate with a user directly via a GRUB prompt. A GRUB prompt is the stage before GRUB loads an operating system and can be triggered at a text-mode GRUB booting screen (which is controlled by the configuration file "menu.lst" (or "grub.conf": see below)) by pressing the "c" key. A GRUB prompt (similar to bash) can also be obtained by booting GRUB as a stand alone system without an operating system attached or in any GRUB installation with an operating system when the "menu.lst" file is absent. From the GRUB prompt a user can manually select and control booting from any installed operating system by using bash-like commands. To boot an operating system automatically, the appropriate commands are placed in a configuration file called "menu.lst" in a designated subdirectory.

GRUB has a rich set of terminal commands that allow a user at the GRUB prompt to view the partition details of the hard disks, alter a partition setting, re-map the disk order temporarily, boot any user-defined configuration file and to view booting configuration of other boot loaders in file formats GRUB supports. Thus, without prior knowledge of what is installed on a computer one can use GRUB from an external device such as a floppy disk, USB device or a CD-ROM to boot up an installed operating system.

GRUB uses a scrolling screen for selection of operating systems to boot. This means 150 or more booting choices can be controlled by GRUB with ease by adding each to the "menu.lst" configuration file, and selecting one at boot time using the arrow keys.

One boot loader can boot another boot loader by chainloading. GRUB uses the same two to three lines of command sequences to boot any DOS, Windows, Linux, BSD or Solaris system, making it very easy to work with.

Although GNU GRUB can be pre-packaged or retro-built into Unix-like operating systems, there are also specific GRUB implementations for DOS and Windows. GRUB can also be installed as a stand alone system unattached to any operating system. Its implementation requires one file for booting from a CD and two files for booting from a floppy, hard disk or a USB device. These files are available from any Linux Live CD that supports GRUB, making it easily and freely obtainable by computer users.

[edit] Boot process

When a computer is turned on, the computer's BIOS finds the primary bootable device (usually the computer's hard disk) and loads the initial bootstrap program from the master boot record (MBR), the first 512 bytes of the hard disk, and then transfers control to this code.

The MBR contains GRUB stage 1. Given the small size of the MBR, Stage 1 does little more than load the next stage of GRUB (which may reside physically elsewhere on the disk). Stage 1 can either load Stage 2 directly, or it can load stage 1.5: GRUB Stage 1.5 is located in the first 30 kilobytes of hard disk immediately following the MBR. Stage 1.5 loads Stage 2.

When GRUB Stage 2 receives control, it presents an interface where the user can select which operating system to boot. This normally takes the form of a graphical menu, although if this is not available or the user wishes further control, GRUB has its own command prompt, where the user can manually specify the boot parameters. GRUB can also be set to automatically load a particular kernel after a timeout period.

Once boot options have been selected, GRUB loads the selected kernel into memory and passes control on to the kernel, which then continues to start itself. At this stage GRUB can also pass control of the boot process to another loader, using chain loading, for operating systems such as Windows that do not support the Multiboot standard. In this case, copies of the other system's boot programs have been saved by GRUB; instead of a kernel, the other system is loaded as though it had been started from the MBR. This may be yet another boot manager, such as the Microsoft boot menu, allowing further selection of non-Multiboot operating systems. (This behavior is often automatic when modern Linux distributions are installed "on top of" existing Windows systems, allowing the user to retain the original operating system without modification, including systems that contain multiple versions of Windows.)

-----------------------------------------------------------------------------------------
Linux commands for this :-

step 1:- (Move to boot folder)
cd /boot/grub

step 2:- (edit the menu.lst as per your design)

see the grub editor file:-
vim menu.lst (else use gedit )

# menu.lst - See: grub(8), info grub, update-grub(8)
# grub-install(8), grub-floppy(8),
# grub-md5-crypt, /usr/share/doc/grub
# and /usr/share/doc/grub-doc/.

## default num
# Set the default entry to the entry number NUM. Numbering starts from 0, and
# the entry number 0 is the default if the command is not used.
#
# You can specify 'saved' instead of a number. In this case, the default entry
# is the entry saved with the command 'savedefault'.
# WARNING: If you are using dmraid do not change this entry to 'saved' or your
# array will desync and will not let you boot your system.
default 0

## timeout sec
# Set a timeout, in SEC seconds, before automatically booting the default entry
# (normally the first entry defined).
timeout 10

## hiddenmenu
# Hides the menu by default (press ESC to see the menu)
#hiddenmenu

# Pretty colours
#color cyan/blue white/blue

## password ['--md5'] passwd
# If used in the first section of a menu file, disable all interactive editing
# control (menu entry editor and command-line) and entries protected by the
# command 'lock'
# e.g. password topsecret
# password --md5 $1$gLhU0/$aW78kHK1QfV3P2b2znUoe/
# password topsecret

#
# examples
#
# title Windows 95/98/NT/2000
# root (hd0,0)
# makeactive
# chainloader +1
#
# title Linux
# root (hd0,1)
# kernel /vmlinuz root=/dev/hda2 ro
#

#
# Put static boot stanzas before and/or after AUTOMAGIC KERNEL LIST

### BEGIN AUTOMAGIC KERNELS LIST
## lines between the AUTOMAGIC KERNELS LIST markers will be modified
## by the debian update-grub script except for the default options below

## DO NOT UNCOMMENT THEM, Just edit them to your needs

## ## Start Default Options ##
## default kernel options
## default kernel options for automagic boot options
## If you want special options for specific kernels use kopt_x_y_z
## where x.y.z is kernel version. Minor versions can be omitted.
## e.g. kopt=root=/dev/hda1 ro
## kopt_2_6_8=root=/dev/hdc1 ro
## kopt_2_6_8_2_686=root=/dev/hdc2 ro
# kopt=root=UUID=4aceaf01-4d11-4d24-82fa-be463fcb6358 ro

## Setup crashdump menu entries
## e.g. crashdump=1
# crashdump=0

## default grub root device
## e.g. groot=(hd0,0)
# groot=(hd0,2)

## should update-grub create alternative automagic boot options
## e.g. alternative=true
## alternative=false
# alternative=true

## should update-grub lock alternative automagic boot options
## e.g. lockalternative=true
## lockalternative=false
# lockalternative=false

## additional options to use with the default boot option, but not with the
## alternatives
## e.g. defoptions=vga=791 resume=/dev/hda5
# defoptions=quiet splash

## should update-grub lock old automagic boot options
## e.g. lockold=false
## lockold=true
# lockold=false

## Xen hypervisor options to use with the default Xen boot option
# xenhopt=

## Xen Linux kernel options to use with the default Xen boot option
# xenkopt=console=tty0

## altoption boot targets option
## multiple altoptions lines are allowed
## e.g. altoptions=(extra menu suffix) extra boot options
## altoptions=(recovery) single
# altoptions=(recovery mode) single

## controls how many kernels should be put into the menu.lst
## only counts the first occurence of a kernel, not the
## alternative kernel options
## e.g. howmany=all
## howmany=7
# howmany=all

## should update-grub create memtest86 boot option
## e.g. memtest86=true
## memtest86=false
# memtest86=true

## should update-grub adjust the value of the default booted system
## can be true or false
# updatedefaultentry=false

## should update-grub add savedefault to the default options
## can be true or false
# savedefault=false

## ## End Default Options ##

title Ubuntu 8.04.2, kernel 2.6.24-24-generic
root (hd0,2)
kernel /boot/vmlinuz-2.6.24-24-generic root=UUID=4aceaf01-4d11-4d24-82fa-be463fcb6358 ro quiet splash
initrd /boot/initrd.img-2.6.24-24-generic
quiet

title Ubuntu 8.04.2, kernel 2.6.24-24-generic (recovery mode)
root (hd0,2)
kernel /boot/vmlinuz-2.6.24-24-generic root=UUID=4aceaf01-4d11-4d24-82fa-be463fcb6358 ro single
initrd /boot/initrd.img-2.6.24-24-generic


title Ubuntu 8.04.2, memtest86+
root (hd0,2)
kernel /boot/memtest86+.bin
quiet

### END DEBIAN AUTOMAGIC KERNELS LIST

# This is a divider, added to separate the menu items below from the Debian
# ones.
title Amaresh Will we Choose 2nd OS ?:
root


# This entry automatically added by the Debian installer for a non-linux OS
# on /dev/sda1
title Microsoft Windows XP Professional
root (hd0,0)
savedefault
makeactive
chainloader +1

Step3:-
-----------
If you want to change time out section:-
--------------------------------------------

By default it will be 10 second if you want to increase to 20 second then just do change 10 to second

## timeout sec
# Set a timeout, in SEC seconds, before automatically booting the default entry
# (normally the first entry defined).
#timeout 10
timeout 20

If you want to change the color of loader screen:--
---------------------------------------------------

# Pretty colours
#color cyan/blue white/blue

Just uncomment the color and you will get color background!!

change to:-

It will give normal blue background.:-

# Pretty colours
color cyan/blue white/blue

It will give blinking letter with blue background:-

# Pretty colours
color white/blue

If you have multi OS:---
----------------------------
suppose you have two OS i,e Linux and Window and linux is default OS and window is Optional OS ,

example:-

title Ubuntu 8.04.2, kernel 2.6.24-24-generic
root (hd0,2)
kernel /boot/vmlinuz-2.6.24-24-generic root=UUID=4aceaf01-4d11-4d24-82fa-be463fcb6358 ro quiet splash
initrd /boot/initrd.img-2.6.24-24-generic
quiet

title Ubuntu 8.04.2, kernel 2.6.24-24-generic (recovery mode)
root (hd0,2)
kernel /boot/vmlinuz-2.6.24-24-generic root=UUID=4aceaf01-4d11-4d24-82fa-be463fcb6358 ro single
initrd /boot/initrd.img-2.6.24-24-generic


title Ubuntu 8.04.2, memtest86+
root (hd0,2)
kernel /boot/memtest86+.bin
quiet

### END DEBIAN AUTOMAGIC KERNELS LIST

# This is a divider, added to separate the menu items below from the Debian
# ones.
title Other Operating System:
root


# This entry automatically added by the Debian installer for a non-linux OS
# on /dev/sda1
title Microsoft Windows XP Professional
root (hd0,0)
savedefault
makeactive
chainloader +1


Do you want to make Window as first loader ?, If so then please follow my bellow

It's dead easy just change the OS position in menu.lst like bellow,

# This entry automatically added by the Debian installer for a non-linux OS
# on /dev/sda1
title Microsoft Windows XP Professional
root (hd0,0)
savedefault
makeactive
chainloader +1

# This is a divider, added to separate the menu items below from the Debian
# ones.
title Will we Choose 2nd OS ?:
root


title Ubuntu 8.04.2, kernel 2.6.24-24-generic
root (hd0,2)
kernel /boot/vmlinuz-2.6.24-24-generic root=UUID=4aceaf01-4d11-4d24-82fa-be463fcb6358 ro quiet splash
initrd /boot/initrd.img-2.6.24-24-generic
quiet

title Ubuntu 8.04.2, kernel 2.6.24-24-generic (recovery mode)
root (hd0,2)
kernel /boot/vmlinuz-2.6.24-24-generic root=UUID=4aceaf01-4d11-4d24-82fa-be463fcb6358 ro single
initrd /boot/initrd.img-2.6.24-24-generic


title Ubuntu 8.04.2, memtest86+
root (hd0,2)
kernel /boot/memtest86+.bin
quiet


Some Interesting Stuffs!!:-
---------------------------

# This is a divider, added to separate the menu items below from the Debian
# ones.
title Amaresh!, Choose my OS?:
root

title IndiaStudyChannel.com(Linux)
root (hd0,2)
kernel /boot/vmlinuz-2.6.24-24-generic root=UUID=4aceaf01-4d11-4d24-82fa-be463fcb6358 ro quiet splash
initrd /boot/initrd.img-2.6.24-24-generic
quiet

title IndiaStudyChannel.com (recovery mode)
root (hd0,2)
kernel /boot/vmlinuz-2.6.24-24-generic root=UUID=4aceaf01-4d11-4d24-82fa-be463fcb6358 ro single
initrd /boot/initrd.img-2.6.24-24-generic


title IndiaStudyChannel.com, memtest86+
root (hd0,2)
kernel /boot/memtest86+.bin
quiet


# This entry automatically added by the Debian installer for a non-linux OS
# on /dev/sda1
title ittipsandtrics.blogspot.com(Windows)
root (hd0,0)
savedefault
makeactive
chainloader +1


It's all about Grub,

Still you need any new option then please do comment! else feel free to give mail.

Thanks & Regards,
-Amaresh Chandra Das
http://www.indiastudychannel.com/projects/ViewProject.aspx?ProjectId=2318

Wednesday, 27 May 2009

Mozilla introduced Jetpack project!!!

http://www.tecspeak.com/sites/default/files/images/2009/05/21/Jetpack_logo.jpg

Mozilla Labs has announced the launch of Jetpack project that explore new ways to extend and personalize the Web. With Jetpack, Mozilla is making the add-on creation process much more accessible technically, allowing anyone who can build a Web site to participate in making the Web a better place to work, communicate and play, the company said.

"With Jetpack, we’re building upon our experience over the last four years empowering a community of more than 8,000 developers to produce more than 12,000 add-ons to imagine and build the next generation of the add-ons platform. We want to grow our community of developers by orders of magnitude through making add-on creation much more accessible, and yet more powerful by developing it as an extensible platform for innovation itself. Many useful Jetpack Features can be written in under a dozen lines of code," said in a blog post by Aza Raskin, Atul Varma, and Nick Nguyen on behalf of the Jetpack development team.

Aza Raskin, head of user experience at Mozilla, added that "Jetpack allows developers to build features that are secure, easy to install, and faster to review. These features can be added to the browser without a restart, or compatibility issues, resulting in little to no disruption to the online experience."

Jetpack will enable developers using Web technologies such as HTML, CSS and JavaScript to enhance the browser. "With Jetpack, building a new Firefox feature will be as easy as simply writing a few lines of code", Mozilla said. "The Mozilla platform gives developers an easy way to connect with the 300 million users of the Web, empowering Mozilla's community of more than 8,000 developers to share their features with the larger online community", the company said.

The version 0.1 of Jetpack includes:

  • Initial Jetpack APIs with support for statusbars, tabs, content-scripts, animations, and more.
  • Support for external API libraries (e.g. Twitter)
  • jQuery support
  • Integrated development environment with Bespin, with immediate installs and a fast development cycle
  • Inline debugging with Firebug
  • This initial release of the Jetpack API does not include a fully formed security model. It is being released for testing, development, and feedback.

Install
https://jetpack.mozillalabs.com/

Want to add alexa on firefox ?

Dear all,

uzz up!Alexa Ranking,Every One want to be in the top of Alexa Ranking and why not. It is the Best Way to know your website ranking .Alexa Ranking is not a new concept in this Internet Market. It is 13+ more Years Experience in the Market of Internet ,to deliver the Best to its users and Now it is on

You want to see your site ranking through alexa ? then follow the following steps:
  1. Choose Firefox else download me
  2. Choose me
  3. then install and restart your Firefox.
More about alexa:-
Alexa Sparky 1.3.0

by rommel, geoffmack, bewest

Get Alexa data in your statusbar!

Add to Firefox

More Images

Long Description

Sparky is a free Firefox browser plugin built by Alexa, that accompanies you as you surf, providing useful information about the sites you visit without interrupting your Web browsing.

* Learn about Website Traffic Trend information -- Is this site getting more popular, or less popular?

* Get detailed traffic information including Reach and Rank -- How does this site's traffic compare to other sites on the Web?

* Surf more efficiently with Related Links for each page -- If I like this site, are there others that I might want to visit?

Plus, as you surf around the Web with Sparky you are helping to make the Web a better place for everybody by contributing to the traffic information that Alexa provides.

Relater stuffs:-

If still you are facing any problem with this them give comments and i ll try to solve it out.

Thanks,
-Amaresh

Thursday, 14 May 2009

Dell studio 15:-My dvd writer is not working.whenever i insert dvd/cd it ejects it without reading it.

Are you using a windows PC?

If so I ave some suggestions:

1. Go To Start Menu - Control Panel - System
click on the Hardware tab
select the DVD/CD-ROM drives
select the DVD drive in question
RIGHT click to get a menu click on Update Driver

2. If the DVD drive doesn't appear, you may need to reinstall in that case go to Add Hardware and install it.

I hope this helps.

Wednesday, 13 May 2009

tftp SetUP in Linux (U-Buntu)

This is a quick description of how to install and setup a tftp server in Ubuntu.

1. Install tftpd and related packages.

$ sudo apt-get install xinetd tftpd tftp

2. Create /etc/xinetd.d/tftp file and put this entry:

service tftp

{

protocol = udp

port = 69

socket_type = dgram

wait = yes

user = nobody

server = /usr/sbin/in.tftpd

server_args = /tftpboot

disable = no

}

3. Make /tftpboot directory

$ sudo mkdir /tftpboot

$ sudo chmod -R 777 /tftpboot

$ sudo chown -R nobody /tftpboot

4. Start tftpd through xinetd

$ sudo /etc/init.d/xinetd restart

5. Testing. Tranfering file test.txt from 192.168.1.100 (Client using tftp) to 192.168.1.100 (Server 192.168.1.100). Get an example file to transfer (eg. test.txt)

$ touch /tftpboot/test.txt

$ chmod 777 /tftpboot/test.txt

$ ls -l /tftpboot/

total 0

-rwxrwxrwx 1 amaresh amaresh 707 2006-03-27 23:07 test.txt

$ tftp 192.168.1.100

tftp> put test.txt

Sent 722 bytes in 0.0 seconds

tftp> quit

$ ls -l /tftpboot/

total 4

-rwxrwxrwx 1 amaresh amaresh 707 2006-03-27 23:07 test.txt

How to view your Picasa photo's on Blogs ?

It will act on all type blogs like webpress,blogger etc..

Open Picasa account --> Login to Picasa,

Then go to your albm,

Then click on the red spot,

then click on the red sopy i'e Embaded slide show,


then either click on Get Your Own else copy the HTML code (lest Red rounded code )

Then paste this code in

Paste that HTML code Here,

----------------------------------------------------------------------------------------------------------------------------------

<div style="width:400px;font-family:arial,sans-serif;font-size:13px;"><div><embed type="application/x-shockwave-flash" src="http://picasaweb.google.com/s/c/bin/slideshow.swf" width="400" height="267" flashvars="host=picasaweb.google.com&hl=en_US&feat=flashalbum&RGB=0x000000&feed=http%3A%2F%2Fpicasaweb.google.com%2Fdata%2Ffeed%2Fapi%2Fuser%2Famareshchandradas2005%2Falbumid%2F5333448294418359985%3Falt%3Drss%26kind%3Dphoto%26authkey%3DGv1sRgCOygwc6e9sGl4QE%26hl%3Den_US" pluginspage="http://www.macromedia.com/go/getflashplayer"></embed></div><span style="float:left;"><a href="http://picasaweb.google.com/amareshchandradas2005/AwesomePictures?authkey=Gv1sRgCOygwc6e9sGl4QE&feat=flashalbum" style="color:#3964c2">View all</a></span><div style="text-align:right;"><a href="http://picasaweb.google.com/lh/getEmbed?feat=flashalbum" style="color:#3964c2">Get your own</a></div></div>


---------------------------------------------------------------------------------------------------------------------------------


DO save and enjoy with your Pictures,

If you ll get any problem then comment me, i will guide you , Good Luck!!

Thanks,

-Amaresh


Tuesday, 12 May 2009

Falling snow effect on your blog

This is very cool widget for your blog, if you like snow i will lead you how to add to your blog , just with very simple step.copy this code

<script src="http://www33.websamba.com/anhvosite/blogger/js2/snow-effect.js" type="text/javascript"></script>

and add it before tag
</head>

Thats all
now save and join

note:
you can go to that link : SnowFall

Reference:--

Cheerz \m/

How wil you add counters in Blogs ?

Dear all ,

It's dead easy, feel free to log in Start Counter,


Then follow the instruction as per the site "http://www.statcounter.com/"

finally , you will get a HTML code , copy (ctrl -c) this HTML code and paste as per bellow instruction,


paste (ctrl-v) HTML code and save it

Now view your blogs ,

Good luck
If you are in difficult please leave a comment.I will answer you.

Monday, 11 May 2009

Make your blog redirect to another address ?

Some bloggers asked me is there any way to get the visitors back to their new domain without changing anything!They have been using blog for a long time and they wanted to make a website instead of it, but they didn't want to lose their familiar visitors.This is a really hard problem to some bloggers, so this tip will help you to get back your visitors ( not perfect but it can get back 90 % perhaps).

This is called redirect address , it means you have to put 1 short meta tag to your blog source , before tag :


<meta http-equiv="refresh" content="0;url=http://yournewurl.com"/>


That's it , just replace the red word by your new address then your old blog will redirect to your new site ( include any address and you can use it to redirect all your sub blogs to your mail blog, too).

Save and don't bother about the visitors.Keep thinking about your new address name.

How to show code in your any Bolgs or Post ?

If you want to lead your visitors to do somethings about web development but you can not put the codes in the post so this is maybe a big problem.You don't believe ? Go to "Create new post" and type the word

Use this link and paste the modified code here ,

Link:-Simple Code "http://www.simplebits.com/cgi-bin/simplecode.pl?"


Thanks,
-Amar

how to add visitor counter in blogspot ?

For Blogger / Blogspot. You simply need to:

  1. Sign up for a free account at StatCounter and follow the 'Install Code' wizard to generate your StatCounter code.
  2. When prompted, make sure to choose Blogger / Blogspot as your Blog/Web Page Editor from the drop down list.
  3. Copy the StatCounter code.
  4. Log into your Blogger / Blogspot blog.
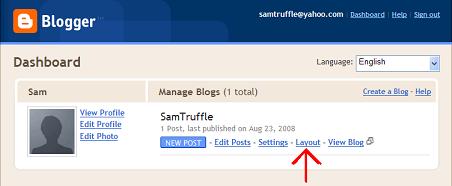
  5. Go to the layout area.

    Blogger - Layout

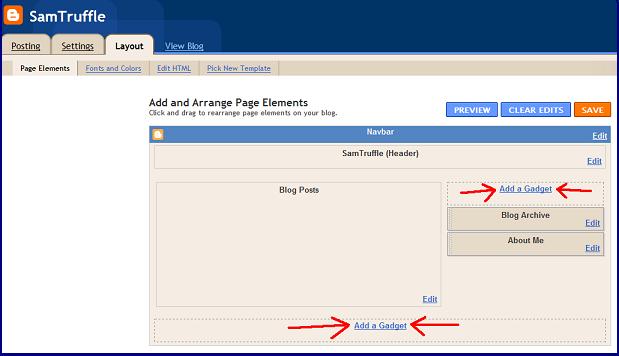
  6. Click one of the “Add a Gadget” links at the bottom or to the right of your blog layout area (as indicated in the picture). (Note from the screenshot that we are in the “Page Elements” tab of the “Layout” area.)

    Blogger - Add a Gadget

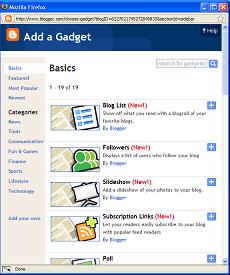
  7. Clicking “Add a Gadget” opens a new window similar to the one pictured below.

    Blogger - Add a Gadget Window

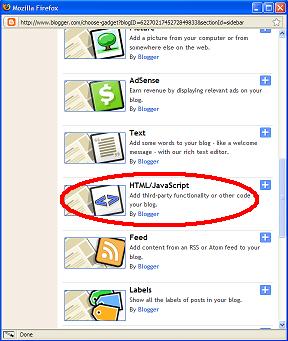
  8. Scroll down through the list of Basic gadgets to find the HTML/Javascript gadget as shown in the picture below. Click the text (that says HTML/JavaScript) to add the gadget to your blog.

    Blogger - HTML/Javascript Gadget

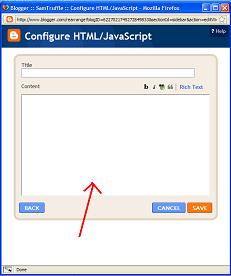
  9. Paste the StatCounter code into the content section of the gadget.

    Blogger - HTML/Javascript Gadget

  10. Click "Save" and that's it!
Your StatCounter will now begin recording visitor information and, if you chose the visible option, your StatCounter will be visible on your blog!

Add Your URL to Google!!!

Dear all,


If you want to publish your URL through Google as it's totaly free to add url,

So Please follow the bellow steps:-
  1. collect own url site like "www.bangaloreorbit.com"
  2. add your url in google "http://www.google.com/addurl"

Cheers \m/
-Amar

Thursday, 7 May 2009

Access Tools Repository(CVS)

This is a general dump (and backup) of all code that is written as test or example systems for other projects. Additionally any third party tools that we would like to keep together and have access to will also be stored here. In general it should be used to store anything that will help others with developing and testing our products.
To Create (add) a new module to the repository:

1. Move all your source files into a directory
2. Perform a "make clean" to clear out unneeded files
3. Delete any backup files
4. run the following command:
* "cvs -d username@cvs:/files/cvs/tools import "
o where:
- what you want your module to be called
- company where code originated
- just pick a name to use as a revision tag
example:
o "cvs -d amareshcd@cvs:/files/cvs/tools import vcomvs VCOM vcomvs_01"

To check out code from the repository:

1. create yourself a directory that you wish for the files to be checked into
2. run
* " cvs -d username@cvs:/files/cvs/tools get -PA "
where:
- What you named the tool in the import
example:
"cvs -d amareshcd@cvs:/files/cvs/tools get -PA vcomvs"

To find out what tools are in the repository:

1. ssh into cvs
2. type: "ls -al /files/cvs/tools/" (It's depend on your file location)

Setup tftp server in Ubuntu Linux

This is a quick description of how to install and setup a tftp server in Ubuntu.

1. Install tftpd and related packages.

$ sudo apt-get install xinetd tftpd tftp

2. Create /etc/xinetd.d/tftp file and put this entry:

service tftp

{

protocol = udp

port = 69

socket_type = dgram

wait = yes

user = nobody

server = /usr/sbin/in.tftpd

server_args = /tftpboot

disable = no

}

3. Make /tftpboot directory

$ sudo mkdir /tftpboot

$ sudo chmod -R 777 /tftpboot

$ sudo chown -R nobody /tftpboot

4. Start tftpd through xinetd

$ sudo /etc/init.d/xinetd restart

5. Testing. Tranfering file test.txt from 192.168.1.100 (Client using tftp) to 192.168.1.100 (Server 192.168.1.100). Get an example file to transfer (eg. test.txt)

$ touch /tftpboot/test.txt

$ chmod 777 /tftpboot/test.txt

$ ls -l /tftpboot/

total 0

-rwxrwxrwx 1 amareshcd amareshcd 0 2006-03-27 23:04 test.txt

$ tftp 192.168.1.100

tftp> put test.txt

Sent 722 bytes in 0.0 seconds

tftp> quit

$ ls -l /tftpboot/

total 4

-rwxrwxrwx 1 amareshcd amareshcd 707 2006-03-27 23:07 test.txt

GCC Setup for compiling the Bootloader (Debian Linux)

To compile the bootloader on Ubuntu, follow these steps:
  • check gcc version :-
command :- gcc --version
example:-
amaresh@AmSi:~$ gcc --version
gcc (GCC) 3.3.6 (Ubuntu 1:3.3.6-15ubuntu4)
Copyright (C) 2003 Free Software Foundation, Inc.
This is free software; see the source for copying conditions. There is NO
warranty; not even for MERCHANTABILITY or FITNESS FOR A PARTICULAR PURPOSE.
  • Do following way:-
sudo apt-get install gcc-
sudo rm /usr/bin/gcc
sudo ln /usr/bin/gcc- /use/bin/gcc

Example:-
sudo apt-get install gcc-3.3
        sudo rm /usr/bin/gcc
sudo ln /usr/bin/gcc-3.3 /usr/bin/gcc

Screen Tips (Linux)

Screen is a terminal emulator that allows you to detach/reattach to running programs. This allows you to have many programs running in tabs on one console connection. You can then detach from that instance of screen, logout, go home, login and reattach as if nothing happened.

This makes it significantly easier to have the same working environment over the VPN as you do at your desktop.
Quick Introduction

type: screen

You will be sitting at a bash shell as if nothing changed. However, you are now running bash inside of screen. All commands that are directed at screen are prefixed with Ctrl-a (C-a)

Now, try this: C-a c as in Ctrl-a create new tab.

And then: C-a " as in Ctrl-a (quote)

This should list the two tabs you have open, you can use up and down to move between them.

Launch vim and type some words in the vim session. Now hit: C-a p as in Ctrl-a previous.

Your vim will dissappear and you will be at your first tab again, at a bash prompt.

Now hit: C-a d (Ctrl-a detach) to drop you back to the original command line. Do a quick ps aux | grep screen to see your screen session is still running.

You can actually exit the shell session or completely disconnect from your ssh session (like ssh to blizzard) and your screen will still be there waiting for you.

When you are ready to reconnect to your screen just type: screen -r
Command Overview

Key
Action :- Ctrl-a c
New tab :- Ctrl-a n
Next tab :- Ctrl-a p
Prev tab :- Ctrl-a "

List tabs, interactively choose 1

Ctrl-a Ctrl-a

Goto last tab :- Ctrl-a N
Goto N tab :- Ctrl-a d

Detact from session :- screen -r

Reattach to a session (run from command line) :- screen -d -r

Reattach to a session, detaching an attached session first if necessary (nice if you want to see a running screen state from a different location)
screen -x

Attach to your running session (run from command line). This allows you to have two terminal windows connected to the same screen session (yes, you can watch yourself type)

Ctrl-a A


Rename this tab
Ctrl-a S

Split current tab into two horizontally into regions

Ctrl-a :resize
Resize current region
Ctrl-a tab

Move to next region
Ctrl-a M

Monitor a tab for activity
Ctrl-a _

Monitor a tab for silence
~/.screenrc

Add these lines to your ~/.screenrc for some prettiness:

startup_message off
hardstatus alwayslastline
hardstatus string '%{.k}%{g}[ %{G}%H %{g}][%= %{wk}%?%-Lw%?%{=b kR}(%{W}%n*%f %t%?(%u)%?%{=b kR})%{= kw}%?%+Lw%?%?%= %{g}][%{Y}%l%{g}]%{=b C}[ %m/%d %c ]%{W}'


This will stop displaying the welcome message and add a status line across the bottom that lists the host, your open tabs, the servers cpu usage and the current time

Linux Tips & Tricks here

Setup a Disk Drive

*Create a Partition:
o fdisk /dev/(device i.e. sdb)

File system types
o For ext2 use 'mke2fs'

For ext3 use 'mke2fs -j'

For reiserfs use 'mkreiserfs'

For xfs use 'mkfs.xfs'

For jfs use 'mkfs.jfs'

Create a file system (example)
o mke2fs /dev/(device i.e. sdb1)

Activate drive:
o Add entry to /etc/fstab
+ vi /etc/fstab

Mount all devices in fstab
+ mount -a

Note: If unfamiliar with vi, use pico to edit in non visual interface

Mount a Floppy Disk Drive

* mount -t msdos /dev/fd1 /mnt/floppy

(or use ufat instead of msdos)

Search for installed packages

* rpm -qa|grep package (redhat)
* dpkg -qa | grep (Debian Linux)

Remove Installed Package

* rpm -e package (Red Hat)
* dpkg -P package (Debian Linux)
else
apt-get remove package
Managing Most Services

* /etc/init.d

then use command stop i.e. ./Kasenna_Apache stop

Make a link

* ln -s destinationoflink linkname

Check kernel version

* uname -r

Make images of cd-roms or hdd

* dd if=/dev/hda of=/dev/hdc bs=4k block_size

Messages (to other users)

* Send to all
wall message

Send to one user (insert message after
write user

Send to one user on a specific terminal
write user tty1

Compare 2 Source Code Files

* diff -u file1 file2

+ means in #2 not in #1 - means in #1 not in #2

Make software tarball (compression methods)

*

tar -cvf hi.tar *

then

gzip hi.tar

Create md5 check sum

*

md5sum -b boot.gz

Find a file

*

find (dir) -name filename
o

eg. find ./ -name help.txt

find and execute a command on all found files:
o

find (dir) -name (expr) | xargs (command)

Search several text files in several directories

*

grep -r --with-filename 00:00:00:00:00: */mac_table

Get the size of all sub-directories

* du -s *

(use -sk for kilobytes or -sh for human readable)

Send e-mail from console

* echo "Message" | mail -s "subject" recipient1 recipient2 recipient3

Remove first character of line

* cut -c 2-

Remove password on sudo

* in ~/.bash_profile place the line:

export SUDO=sudo

as root run visudo uncomment

%wheel .... no passwords

add users who need passwrodless sudo to wheel group

vi /etc/group

Increase Priority of Process

* nice -n

(pri -20 to 20 where -20 is the fastest or highest priority)

To get files from a ramdisk

* Copy ramdisk to temp dir then:

gunzip ramdisk

mount -o loop -t ext2 ramdisk_img

Get the required files then:

umount

To print a test file from the cli

* lpr filename

To count the number of lines with sed

* sed -n '$=' filename

cat filename | sed -n '$='

Grab One Line out of a Text File

* cat textfile | sed -e 's#\t##g' | sed -n "Line_Number"

Replace one line in a textfile

* sed 10c\\"New_String = -mq${1}" textfile
o

-- Where 10 is the line number

Pull Out String From Line

* echo "inet addr:192.168.145.11 Bcast:192.168.145.255" |sed -e 's/[^i]*inet addr:\([0-9.]*\).*/\1/p'

Redirect Command output

* Redirect Standard to Null

* command > /dev/null
Redirect All Standard to Null

command &> /dev/null

Redirect Errors to Same Location as Standard

command > /dev/null 2>&1

Redirect Errors to Null

command 2> /dev/null

Redirect Standard to File

Just replace "/dev/null" with filename

-- use '>>' to append file instead of overwrite '>'

Use vi in split screen mode

* Enter split screen

* :split
o

Open new file

:e path/filename
o

Switch to Upper Window

ctnl+w k
o

Switch to Lower Window

ctnl+w j

Create a cron job entry

*

Run the crontab editor

crontab -e

Then add entry

Example crontab

*

A decent cron template. Remove commands or add commands as needed (was used for Gentoo so emerge commands will not be valid on a non-Gentoo rig)

#!/bin/sh
cdmailto=me
SHELL=/bin/bash
PATH=/sbin:/bin:/usr/sbin:/usr/bin:$HOME/bin
# minute (0-59),
# | hour (0-23),
# | | day of the month (1-31),
# | | | month of the year (1-12),
# | | | | day of the week (0-6 with 0=Sunday).
# | | | | | commands

# ------{ default cron crap }---------- #
0 * * * * rm -f /var/spool/cron/lastrun/cron.hourly
1 3 * * * rm -f /var/spool/cron/lastrun/cron.daily
15 4 * * 6 rm -f /var/spool/cron/lastrun/cron.weekly
30 5 1 * * rm -f /var/spool/cron/lastrun/cron.monthly
*/10 * * * * /usr/bin/test -x /usr/sbin/run-crons && /usr/sbin/run-crons
# ------{ daily cron jobs }------------ #
0 1 * * * emerge sync >/dev/null 2>&1
0 2 * * * /backup/backup.sh
40 1 * * * emerge -uDpv world >/home/ben/Reports/emerge.txt
0 3 * * * updatedb && eupdatedb >/dev/null 2>&1
0 4 * * * glsa-check -l | grep '\[N\]'
# ------{ weekly cron jobs }----------- #
15 7 * * 0 makewhatis
0 7 * * 1 fc-cache -fv
0 4 * * 2 tar -cvzf /backup/weekly-backup.tgz /backup/weekly/*
10 4 * * 3 rsync -v -a --delete /backup/weekly-backup.tgz /mnt/nfs/backup/weekly-backup.tgz
# ------{ bi-weekly & monthly jobs }--- #
"

Links

http://www.acck.edu/~jerod/spellbook.html
Boot into single user mode

1. On boot up get to the grub menu 2. press 'e' to edit your boot parameters 3. add "init=/bin/sh" to the list of kernel parameters 4. save and then boot off that modified selection 5. you will now have root access in singl user mode

testing


Free DHTML scripts provided by

Dynamic Drive

Wednesday, 6 May 2009

SCCS - (Source Code Control System)

The following commands assume an SCCS repository in /sccs.


----------------------------------------------------------------------------------

To get a read only copy of a file:

get /sccs/migrate/scripts/s.

NOTE: You can get multiple files using standard Unix wildcard

----------------------------------------------------------------------------------

To get an editable copy of a file:

get -e /sccs/migrate/scripts/s.

-----------------------------------------------------------------------------------

To check edited copy into repository:

delta /sccs/migrate/scripts/s.

NOTE: Please put in a comment when prompted.
Also, the delta command removes the file from your directory so you have to
get it again if you want to run it.

----------------------------------------------------------------------------------

To get history of changes:

prs /sccs/migrate/scripts/s.

----------------------------------------------------------------------------------

To compare two revisions of a file (Example rev 1.6 and 1.7):

sccsdiff -r1.6 -r1.7 /sccs/migrate/scripts/s.

-----------------------------------------------------------------------------------

To add a new file:

admin -i -y"COMMENT" /sccs/migrate/scripts/s.

The admin does not remove it from your directory.
However, the unexpanded keywords are still in the file so it appears to
be an editable copy.

Backing up the CVS Repository - (CVSNT-Window)

One the easiest ways in which to backup the CVS Repository on Windows is to schedule a task that runs under and known account. Put the following into a batch file and run it from the schedule:
net stop CVS
xcopy d:\cvsrepo \\server\cvsbackup /Q /S /C /H /R /O /Y
net start CVS

Logging into CVS / Setting CVSROOT - (CVSNT-Window)

Now let's cover what is possible the most difficult component of CVSNT and that is security and adding users. Please be aware that as I write this section of the documentation, I still have a tremendous amount to learn about security within CVSNT. I am only writing this section with what I know and how to get logged on using a local area network. If you are connecting your CVS repository to the Internet, please be aware that there are security problems with the :pserver: protocol. As I learn more about security with CVSNT, I will continue in updating this section of the documentation.

Using a Local Version of CVS

In some cases, you may be developing on the same machine as the CVS server. In this case, you can simply set the CVSROOT environment variable to the absolute path of the CVS Repository. For example:
C:\> set cvsroot=c:\cvsrepo\test

C:\> cvs ls -l -R

Listing modules on server

Directory CVSROOT

checkoutlist 1.1 Fri Jan 23 16:19:24 2004
commitinfo 1.1 Fri Jan 23 16:19:24 2004
config 1.1 Fri Jan 23 16:19:24 2004
cvsrc 1.1 Fri Jan 23 16:19:24 2004
cvswrappers 1.1 Fri Jan 23 16:19:24 2004
editinfo 1.1 Fri Jan 23 16:19:24 2004
historyinfo 1.1 Fri Jan 23 16:19:24 2004
loginfo 1.1 Fri Jan 23 16:19:24 2004
modules 1.1 Fri Jan 23 16:19:24 2004
notify 1.1 Fri Jan 23 16:19:24 2004
postcommit 1.1 Fri Jan 23 16:19:24 2004
rcsinfo 1.1 Fri Jan 23 16:19:24 2004
taginfo 1.1 Fri Jan 23 16:19:24 2004
verifymsg 1.1 Fri Jan 23 16:19:24 2004

Directory CVSROOT/Emptydir
Using the :pserver: Protocol
This section discusses how to add CVS users. Keep in mind that adding users to CVS is only required if you are using the :pserver: protocol. If your users are all on MS Windows PC's, this is not recommended since it has inherent security flaws. It would be better to use either SSPI or :ntserver: (keep in mind however that :ntserver: is being phased out now) because these protocols integrate much better with Windows NT. If you do plan on using the SSPI protocol, then you can skip this discussion of how to add and manage users.

To start, open a command window and do the following - (replace all items with the real values from your system) :

NOTE: When using the :ntserver: protocol, the computer name cannot be entered as "localhost", it must be the real name of the computer.

C:\> set cvsroot=:pserver:@:/TEST
The following example, I will loging to CVS using the :pserver: protocol. The CVS server is named bartman and my user name is jhunter. Keep in mind that I needed to first create the local user, jhunter, on the CVS host. (Which in this example is named bartman.)
C:\> set cvsroot=:pserver:jhunter@bartman:/TEST

C:\> cvs login
(Logging in to jhunter@bartman)
CVS password: *******
To logout of the CVS user, use the following:
C:\> cvs logout
(Logging out of jhunter@bartman)
Using Other Protocols
C:\> set cvsrot=:sspi:jhunter@bartman:/test

C:\> cvs login
(Logging in to jhunter@bartman)
CVS password:**********

C:\> cvs logout
(Logging out of jhunter@bartman)

C:\> set cvsrot=:local:jhunter@bartman:/test

C:\> cvs login
(Logging in to jhunter@bartman)
CVS password:**********

C:\> cvs logout
(Logging out of jhunter@bartman)

Creating a CVS Repository - (CVSNT-Window)

  1. First, open the CVSNT Control Panel applet. The applet is located in the Control Panel and is generally called CVS for NT (the green fish). A full description of the CVSNT Control Panel applet is described above (in the Post Installation Steps section).

  2. Then, check to make sure that the CVS Service is not running. If it is, click on the Stop button to stop the service.

  3. Now you will need to set the Repository Prefix. Go to the "Repositories" tab. It will initially look like this:

    Check the checkbox for the Repository Prefix and browse to the directory you created c:\cvsrepos using the ellipsis button.

    After successfully setting the Repository Prefix and selecting the Repository Prefix directory, your screen should look like the following:

  4. Now let's create our first CVS repository. To do this, we will stay on the same screen we were on (above) and click the "Add" button. This will bring up the "Enter path to new root" dialog. Fill this dialog box in as follows:

    After hitting the "OK" button, your screen should look like the following:

  5. Now go to the "Advanced" tab and view the checkboxes. Initially, this screen should look like the following:

    In this screen, first change the Temporary Directory to C:\cvstemp.

    Now go back to the protocol support. Here you have three options to set/clear:

    • Support ntserver protocol. This is what CVSNT has been using for NT connectivity, but it is being phased out in favor of the SSPI protocol, which works over TCP/IP.
    • Impersonation enabled. This setting allows CVSNT to operate in the guise of the user actually doing the command. So with this flag on you can use file system permissions.
    • Use local users instead of domain. Use this if you don't have a domain to authenticate against. Note that in this mode your users must have valid accounts on the server PC itself.

    For these tests check all checkboxes (except for "Don't resolve client names"). You can later go back and change these settings at a later time.

    Your "Advanced" screen should now look like the following:

    NOTE: You MUST click the "Apply" button. This is important. Nothing will happen unless you hit the Apply button. Note that after you have done this, the "Apply" button is disabled.

  6. Finally, go back to the "Service Status" tab and start the CVS Service service. If your service successfully starts, your screen should look like the following:

Installing WinCVS (CVSNT-Window)

Overview
CVS is the Concurrent Versions System, the dominant open-source network-transparent version control system. CVS is useful for everyone from individual developers to large, distributed teams:

This articles provides an overview of the steps required to install and configure CVSNT, version 2.0.14.

Downloading CVSNT
You can download the Windows version of CVS, named CVSNT, from the following site:
    Windows version of the CVS: http://www.cvsnt.org
Here are several other CVS website that you may find useful:
    CVS Domain Home Page:       http://www.cvshome.org
GUI front-end for CVS: http://www.wincvs.org
Java client: http://www.jcvs.org
Installing the CVSNT Software
IMPORTANT: Use a local disk! CVSNT does not work properly unless the repository files are located on a disk on the local PC. Don't try to use a network drive or a mapped disk (not even a mapped disk aimed at the local PC)! It will not work and there are numerous reasons, here is one

CVSNT runs as a service and thus acts as the SYSTEM user account. This account has no permissions on the network and so cannot access the files if they are on a remote server. In fact if the files are on the same PC does not help either if they are accessed using the network via an UNC path. The dive is still considered to be on the network where SYSTEM cannot operate. So don't even try to create such a configuration!

Before starting the CVSNT installation, create two directories on the target machine:

c:\cvsrepo
c:\cvstemp

NOTE: The important point here is that the disk where the repository is located on is NTFS. Where CVSNT itself is installed in not important, it can be on FAT32 or NTFS or whatever. In this document I assume that C: has been used.

NOTE: The cvstemp directory must NOT be located in either c:\WINNT\Temp or anywhere in the "C:\Documents and Settings" tree because these locations have imposed restrictions on user access in Win2000 and Win-XP!

Now run the downloaded CVSNT setup file. For the purpose of this example, I will choose to install CVSNT to the path c:\cvsnt

The following is a set of screen shots along with detailed information on how to install the CVSNT software product.

Welcome Screen


License Agreement

Install Directory Selection

As stated in the introduction, I will be installing CVSNT to c:\cvsnt. I generally try to avoid directory names with spaces.


Anti-virus Software Warning

You version of CVSNT may prompt you with another screen indicating that Anti-virus software can cause corruption in your repository. There will be a checkbox that you have to select saying that I understand before you can continue the installation.


Installation Component Selection Screen

When installing CVSNT, all of the components may not be required to install it as a server. Make sure to check all components in this screen (as shown below).


Shortcut Folder Selection

Task Selection Screen

On some versions of CVSNT, some of the tasks may not be selected. Make sure that all tasks are selected (as shown in the above screen).


Ready to Install Screen

Installation Progress Screen

Installation is Complete!

Post Installation Steps
  1. Note that there are times where the installer may complain that it was not table to set the PATH environment variable at the end of the installation. If this happens, you can simply open the Control Panel and double-click the System icon. Go to the Environment tab (for Windows 2000) or the Advanced tab (for Windows XP). From there you will need to set the System variable path to include c:\cvsnt; to the begining of the PATH variable and save it (Apply).

    Location of this setting page varies between NT4, Windows 2000, and XP. You may have to search around a bit.

  2. Ensure that the CVSNT Control Panel Configuration applet was installed. To do this, open your Control Panel and look for the CVSNT applet (the green fish).

    If you have problems locating the CVSNT Control Panel applet, it might be because one or several of a few system .DLL's are missing. These libraries were suppose to be installed by the CVSNT installer, but sometimes this step fails. The files you will need can be extracted from the binary download of CVSNT. These are the files that you might find missing:

    Once you have located the files, copy them to the %WINDOWS%\system32 folder.